Monday, January 30, 2012

Mini Elephant Ears

One breakfast treat that Ole Sweetie-Pi makes for himself is cinnamon-sugar toast.  I keep a jar of cinnamon-sugar on the spice shelf just for that reason.  So when I saw this super simple recipe for elephant ears on mrfood.com I knew it would be a winner here.  And I was right...

Six mini elephant ears and a cup of coffee later, Ole Sweetie-Pie was still saying how much he loved them! 

Mini Elephant Ears

2 frozen puff pastry sheets (from a 17 1/4-ounce package) slightly thawed
1 cup sugar
2 teaspoons ground cinnamon
1 egg beaten

Preheat your oven to 400*F.  Lightly coat a baking sheet with cooking spray.**

On a lightly floured surface, roll the puff pastry into a 12 inch x 12 inch square.  Brush with beaten egg.


Combine the cinnamon and sugar in a small bowl.  Sprinkle 3 tablespoons of the cinnamon-sugar mixture even over the top of each sheet.

Roll one side of the pastry sheet into the middle.


Then roll the other side towards the center so that the two halves meet in the middle, forming a scroll.  Cut into 1/2 inch slices across the scrolls.


Dip one cut side into cinnamon-sugar and lay sugared side up on prepared baking sheet.

Bake for 20 minutes or until beautiful golden brown, then allow to cool for five minutes.  Makes 24 mini elephant ears.


MY THOUGHTS:  If you have it, I would suggest using parchment paper to bake these on.  The sugar carmelizes to the pan, making clean-up a bit sticky.

You don't have to make the whole recipe.  Just take out one puff pastry and rewrap the second and put back in the freezer to use another day.


Friday, January 27, 2012

Ham and Potato Au Gratin

Lawsy mercy this was good!  I had my doubts when I was putting this together, and fretted about it as it was cooking, but once Ole Sweetie-Pi and I took our first mouthfuls, it was love at first bite.  Creamy, cheesy, potato and ham goodness.  It's a old family favorite that needs to be enjoyed more often.  I know we'll be having this again and again. It reheated okay the next day, but some might need a small splash of milk to loosen the cheese.

A saucepan or saute pan that can go from stovetop to oven, without cracking or burning it would be perfect here to save a pan.  If you don't, prepare a separate, buttered casserole dish to put the mixture in before everything goes into the oven.

Ham and Potato Au Gratin
(adapted from http://articles.boston.com/2009-02-18/lifestyle/29258528_1_russet-potatoes-cream-mixture-ham)

Preheat over to 375*F.

2 cups heavy cream
1 cup milk
a couple scrapes of a fresh nutmeg on a grater (or a pinch) of nutmeg
1/4 to 1/2 teaspoon fresh garlic from a jar (or 2 whole cloves garlic, minced)
pinch thyme (about 1/8th teaspoon)

3 or 4 Russet potatoes thinly sliced (about 1/8th inch thick)
1/4 onion thinly sliced

1/2 to 1 pound ham, diced
pepper to taste

8 ounces cheese (I used 4-Italian blend ~ mozzarella, provolone, Romano, Parmesan), divided

Start by putting the cream, milk, thyme, garlic and nutmeg in a medium sized saucepan or saute pan.  Bring to a boil.  Add the potatoes and onions and cook over medium-high heat, stirring gently for about 3 minutes.  Cover the pan, turn the heat to medium-low and cook, stirring occasionally, for 15 minutes.**

Add the ham and pepper to taste. Add the cheese (reserving a small handful for top the casserole) and stir well.  If using a separate casserole dish, pour the mixture into the casserole.  Otherwise cover your saucepan/saute pan with a piece of tinfoil and put in your preheated 375*F oven.  Bake for approximately 35-45 minutes, or until potatoes are easily pierced with the tip of a thin, sharp knife.

Uncover the casserole and sprinkle the remaining cheese on top of the casserole and bake for another 10 minutes or until the cheese topping is a light golden brown.

**MY NOTES ~ When I saw the liquid to potato ratio in the pan, I panicked and thought I'd end up with potato soup, hence the fourth potato.  I probably could have added a fifth potato and it would have been okay.  The cheese and starchy potatoes thicken the sauce, so if it looks a little too milky at the end of cooking, I wouldn't hesitate to add a bit more cheese, grins.

I like ham, but I don't like a pound of ham in with 4 potatoes.

Cooking times are approximate.  Depending on how thick or thin you slice your potatoes, you might not need to cook the potatoes on the stovetop for 15 minutes.  I used a mandolin to slice my potatoes, so they were pretty thin so I only needed  10 minutes cooking time before they were fork tender.  From there I put them in the oven and at the end of 35 minutes the dish was bubbly, hot, cheesy, and the potatoes were done.

Sunday, January 22, 2012

Maraschino Cherry Cake with Fluffy Cherry Frosting


When I was a girl, I dreamed of this kind of cake, all pink and soft with fluffy pink cloud frosting.  It was the cake that I imagined princesses ate.  I had forgotten about those dreams until I ran across the recipe for Maraschino Cherry Cake in The American Century Cookbook (The Most Popular Recipes of the 20th Century) by Jean Anderson.  The moment I saw the recipe I couldn't get it out of my head.  My memories came back to haunt me; I needed to put them to rest.  Even in this present day, as I baked it, I imagined little girls in big shoes and big summer hats with bright silk flowers and lots of opera pearls slung about their necks enjoying this beautiful cake.

After making this cake, I can see why my mother never made it, smiles.  This is not a cake for the distracted, disorganized, or harried cook.  And for the safety of all, it would be wise not to have dashing pets and children in the kitchen.  The steps are not complicated, but there is some preparation involved.  While making the syrup for the frosting, you must be attentive or serious burn injury could result.  The frosting, while very good, is sticky and tends to string and flow about when and where you don't want it to. 

Regardless, if you want to feel like a princess or you know a little girl who is, this cake is fulfills all those dreams.

Read through the recipe first to get a feel for how the recipe flows.

Maraschino Cherry Cake

3 cups sifted cake flour
2 1/2 teaspoons baking powder
1 teaspoon salt
1/3 cup butter, room temperature
1/3 cup vegetable shortening
1 1/2 cups sugar
1/4 cup maraschino cherry juice
3/4 cup milk
1/2 cup coarsely chopped nuts
16 maraschino cherries, cut into eighths
5 egg whites, stiffly beaten

Prepare ahead of time:  Coarsely chop 1/2 cup  nuts.  Cut 16 maraschino cherries into eighths and set aside.  They can be put  together in the same bowl as they will be added at the same time. 

Combine the 1/4 cup maraschino cherry juice and 3/4 cup milk in a one cup measure.  Set aside.

The timing of the stiffly beaten egg whites is a little tricky.  Wait too long and they deflate and get weepy.   After creaming the sugar and butter and shortening, I washed off my egg beaters and then beat my egg whites just before the step that adds the nuts and cherries. 

Now onto the cake...

Preheat oven to 350*F.  Generously grease and flour two 9-inch round** layer cake pans and set aside.

Sift the flour, baking powder and salt together onto waxed paper or in a medium bowl; set aside.

Cream butter, shortening, and sugar in a large bowl until fluffy (about five minutes). 

Add sifted dry ingredients to the creamed mixture alternately with the milk-maraschino cherry juice mixture, beginning and ending with the dry ingredients.  Beat well after each addition.

Fold in nuts and cherries, then fold in the beaten egg whites.

Divide the batter between pans and bake for 30 to 35 minutes, or until springy to touch.

Cook cakes in pans on wire racks for about five minutes.  Using a thin blade knife loosen carefully around edges and turn out onto the racks.  Cool to room temperature.


Pink Cherry Maraschino 7-Minute Frosting
2 1/2 cups sugar
1 tablespoon light corn syrup
1/2 cup water
1/2 cup maraschino cherry juice
3 egg whites, stiffly beaten

Mix sugar, corn syrup, water and cherry juice in medium heavy saucepan, covered, but with lid askew, and heat for five minutes over moderate heat.  Remove lid, insert candy thermometer, and heat, without stirring, until syrup reaches 242*F. (takes about 10-15 minutes).

In the meantime, put three egg whites in a medium sized bowl and beat until stiff peaks form.

When the syrup reaches 242*F, add the hot syrup to egg whites in a fine stream, beating hard the entire time.  Continue beating until mixture peaks stiffly, about 7 to 10 minutes.

**A final word ~ I used two 8" round 2" high cake pans to obtain a nice tall cake.  Baking time was increased by approximately 6 minutes because of the smaller sized pan.

This kind of frosting is best enjoyed on the day it is made.  It looks okay the second day, but by the third it is definitely weepy and crystallized looking.  I would suggest forgoing this frosting on a day with high humidity as it may not set up well for you.

I found the cherry flavor to be delicate.  The recipe does not call for it, but I am thinking perhaps a bit of almond extract might brighten the flavor.  I would be careful about adding cherry extract; you might end up with something akin to cough syrup.

Thursday, January 19, 2012

Lemon Squares


As much as I love lemon flavor, I have never made lemon squares until recently.  Let me assure you, this recipe comes together quickly and easily.  In these cold and dark winter days, it was heartening to have something so bright and citrusy.

I combined two recipes to add lemon zest and more lemon juice, and this still came out too sweet for me.  However, upon taking a small square of it the next day, the lemon flavor had become more pronounced, but was still quite sweet.  Even with the increase in lemon, this still  is not lemony enough for me, but I think I have a sour tooth along with my sweet tooth.

Lemon Squares

Crust:
1 cup butter (no substitutes), room temperature, plus additional to butter the baking pan
2 cups flour
1/2 cup confectioners' sugar
pinch of salt (omit if using salted butter)

Filling:
4 eggs
2 cups sugar
1/4 cup flour
1/4 cup lemon juice (about one large lemon)
zest of one lemon
1 teaspoon baking powder

Additional confectioners' sugar for decoration

For the crust:  Combine all crust ingredients, using pastry crust, two knives, or food processor, or your impeccdably clean hands,  and press into a  buttered 9" x 13" inch pan.  Bake at 350*F for 15 minutes and set aside for a few minutes while you're making the filling.  Leave oven on.

For the filling:  Combine eggs and sugar and beat well.  Add flour, lemon juice, zest, and baking powder.  Pour over the warm crust and bake at 350*F for 20 minutes.

Cool.  Sift or sprinkle a little additional confectioners'sugar on top of squares for decoration.  Serve.

Tuesday, January 17, 2012

Cinnamon-Swirl Raisin Bread

I've had a hankerin' for cinnamon raisin bread for a while now.  It's one of my all-time favorite breakfast treats, and once I get the craving I can't seem to get it out of my mind.  Our local breakfast place doesn't serve it and it's becoming scare as hen's teeth to find it on on our grocer's shelves and when I do find it, the cost is the price of a second mortgage for a good quality loaf.  All I really want is a couple of nice pieces to satisfy my craving.  I know me, if I have a whole loaf, I'll eat it. 

So, I bought a Fine Cooking magazine and lo and behold was a cinnamon-raisin swirl bread recipe.  Is that a divine hint or what?  So, I  dug out my bowls and pastry mat and ingredients and set to make this.

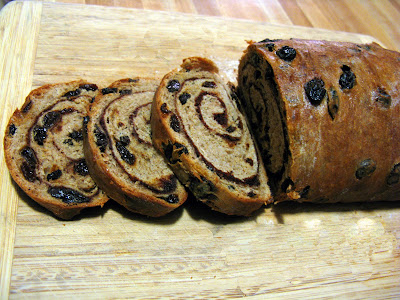
As my grandmother would say, "I'll tell you what..." if you had a loaf of this you'd be hard pressed not to eat an entire loaf in one sitting.   This Fine Cooking recipe is chuck a block full of plumped, juicy raisins  that are added into the dough and a ton of cinnamon, added to the dough and then as part of the filling.  There is absolutely no skimping.   

A couple of caveats:  This is a sticky dough, but not as wet as a  batter bread.  Just stay with the directions; more flour is added later on, but only when it's time to roll it out.

This dough has three risings.  I confess to messing up and only doing two.  Now I'm not sure if it's my cool New England kitchen or the recipe itself (minus the middle rising or could it be the instant yeast had gone past date?), but this bread did not rise well at all for me.  My warm place is setting the loaf pans in a plastic tent in the sun on my kitchen table, and that usually works very well.  When I saw the dough was still not rising, I put my oven on warm, left it on for about 30 seconds, and put the pans of dough in the oven for about 2 hours.  Still the dough didn't rise to bread dough filling the pan.  I baked it anyway, and the bread rose a little more while baking, but still not to the height of  the big loaves I made here.  It took me a couple of minutes to figure out that my older recipe called for double the flour, etc., but not nearly the amount of raisins and cinnamon, smiles.  These Fine Cooking loaves are apparently meant to be small.

These loaves are dense.  In reading the reviews at Fine Cooking, I see that another baker made the same observation, so I want to think (smiles) this is to be expected. 

In the final analysis, this is truly a very good, almost superb, cinnamon-raisin bread.  My chief complaint of other recipes is that the cinnamon and raisins were skimpy and fell out of the rolled bread. My chief complaint with this one is the heaviness of the smallish loaves, which is richly overcome by the abundance of raisins and cinnamon.  Plumping the raisins and adding them directly to the dough along with a generous portion of cinnamon and sugar is positively genius.

Cinnamon-Swirl Raisin Bread
(found at http://www.finecooking.com/recipes/cinnamon-swirl-raisin-bread.aspx)

2 cups dark raisins
light-flavored oil to grease the bowl (such as canola or grapeseed)
4 cups (18 ounces) unbleached, all-purpose flour plus more for dusting (I used King Arthur's flour)
6 tablespoons sugar, divided
6 tablespoons cinnamon, divided
1 packet  (1/4 ounce or 2 1/4 teaspoon) instant yeast
3/4 cup lukewarm water
2 teaspoons salt
1/2 cup whole milk
1 large egg
3 1/2 ounces (7 tablespoons) unsalted butter, softened, plus more for the pans

First plump up the raisins.  Put them in a large measuring cup or bowl and add enough hot water to cover them.  Allow to sit for five minutes and then drain them.

If you are fortunate enough to have a stand mixer, this would be a good time to use it, otherwise you can do this by hand, it's just a little work. 

 In a large bowl, combine the flour, 2 tablespoons each of the sugar and cinnamon, the yeast, and salt. Mix (or whisk) until well combined.  Add the milk, egg, tablespoons of the butter, and 3/4 cup room temperature water.  Mix until well combined, until the dough comes together.  Continue to mix until the dough is smooth and slightly sticky.   Add the raisins to the dough and gently knead in by hand.

For the first rise:  Turn the dough out onto a well-floured surface, roll it into a ball,.  Clean the bowl you were just using, lightly oil it, and put the dough in the oiled bowl. Cover loosely with plastic wrap and let sit at room temperature until the dough looks slightly puffy, about 30 minutes.

For the second rise:  On a well-floured surface, use your hands to flatten and spread the dough out until it’s about 3/4 inch thick. Fold the dough in half from top to bottom, then in half again from left to right. Return the dough to the bowl, cover, and let sit until it has risen slightly, about 30 minutes more.

For the third rise: Lightly grease two 8" x 4" loaf pans with butter.

Starting from the short side, gently roll each rectangle into an 8-1/2-inch-long cylinder. Put the cylinders in the pans, seam side down. Cover loosely with plastic wrap. Let rest at room temperature about 60-90 minutes.  The dough will spring back when lightly poked.

Bake:  Position a rack in the center of the oven and heat the oven to 375°F. Bake the loaves, rotating and swapping the positions of the pans halfway through baking, until dark brown and hollow-sounding when thumped on top and an instant-read thermometer inserted in the center of the loaves registers about 190°F, 30 to 35 minutes. Transfer the loaves in their pans to a rack


Melt the remaining butter and use it to brush the tops of the loaves.  When cool enough to handle, tip the loaves out onto the rack to finish cooling.  Try and wait before slicing into the bread!

Bread stays nice for about five days.  Doubt if you can make it last that long!


Friday, January 13, 2012

Creamy Macaroni and Cheese

Every now and again Ole Sweetie-Pi and I will crave a nice plateful of macaroni and cheese.  There's something special and comforting about pasta and when you add cheese, well it becomes one of the perfect comfort foods.


I found this recipe at the New York Times and was immediately intrigued by it.  First of all, the recipe says to use full fat cottage cheese and two cups of milk (nonskim!).  All righty now ~ a recipe that's not afraid of some fat!  And secondly, the macaroni is not precooked.  Everything pretty much gets dumped in the baking dish and you are good to go.  The recipe scared me; I had to try it.

Only thing is...when I checked the pantry I didn't have elbow macaroni; I had shells.  I checked my fridge, and I didn't have the full pound of cheddar so I ended up using a half and half combination of cheddar and Gruyere.  Yummm...the shells were like little scoops that held bites of cheese.  And the combination of cheeses seemed to work well, the rich and sharp taste of cheddar, with the melty goodness of the Gruyere. 

Sweetie-Pi gave a big YUMS up on this recipe, and I thought it was pretty good, but you'll have to love cheese for this one.  Also, I wish it were a bit creamier in consistency, but I loved the idea of not having to preboil the pasta.  Saved time, energy, and a pot.

Creamy Macaroni and Cheese

2 tablespoons butter, divided
1 cup cottage cheese (not lowfat)
2 cups milk (not skim)
1 teaspoon dry mustard
Pinch cayenne
Pinch  nutmeg
½ teaspoon salt ** (optional)
¼ teaspoon  black pepper
1 pound sharp or extra-sharp cheddar cheese, grated, with 1/4 cup set aside
½ pound elbow pasta, uncooked.

Preheat your oven to 375*F. 

Use one tablespoon butter to butter a casserole dish or square baking pan.

In a blender, combine the cottage cheese, milk, mustard, cayenne, nutmeg salt and pepper.  Puree until smooth.

Grate the cheddar cheese if it's not already grated, reserving 1/4 cup for topping. 

In a large bowl, combine the remaining grated cheese, milk mixture and uncooked pasta.**  Pour into prepared casserole. Cover with foil and bake for 30 minutes.

Uncover the pan, stir gently, and sprinkle with reserved cheese and dot with remaining tablespoon butter.  Continue baking for another 30 minutes or until beautifully browned and bubbly.  Let cool for 15 minutes before serving.

MY NOTES:  In my opinion, cheese is already quite salty.  I did not add the 1/2 teaspoon salt called for in the recipe, and the dish was salty enough.

I mixed everything together in the casserole dish to save a mixing bowl.

The directions state to cover the dish with aluminum foil.  I used a covered casserole dish, but would have used the aluminum foil if I were using a dish that did not have a fitted cover.

Monday, January 9, 2012

Baked Oatmeal

I love baked oatmeal.  It's like cookies for breakfast, only better.  And talk about all kinds of goodness, this has it.  So much tastier than a vitamin pill!  Smiles.  This recipe is pretty versatile; I think you can use whatever dried fruit catches your fancy, add chopped nuts, honey, or as I did, wheat germ. 

This recipes is one I've adapted from Allrecipes.com.  It's a keeper.  Ole Sweetie-Pi won't go near this; he prefers frosted cereals; methinks he is still a kid at heart.

Baked Oatmeal
(adapted from:  http://allrecipes.com/recipe/baked-oatmeal-ii/Detail.aspx)

3 cups rolled oats
1/4 cup wheat germ
1/2 cup brown sugar
2 teaspoons cinnamon
2 teaspoons baking powder
1 cup milk
2 eggs, beaten
2 teaspoons vanilla extract
1 cup dried fruit, all one kind, or a mixture of your choice, nuts, etc.

Preheat oven to 350*F. 

Mix all ingredients together and pour into a 9x13 inch baking pan or casserole large enough to hold the ingredients.  Bake for 40 minutes.

MY NOTES:  Because I upped the ingredients from the original recipe, this makes about six servings.This reheats well in the microwave with milk added to it while it reheats.  I think the addition of the wheat germ makes this a little dry; it doesn't bother me, but you might want to add a bit more milk. 

I think I need some dried blueberries and pecans the next time....yummmmmm!

Sunday, January 8, 2012

Giveaway Winner!!

As you may recall, Shelby of The Life and Loves of Grumpy's Honeybunch celebrated her four-year blog anniversary with a terrific giveaway.  The contest ended yesterday, and she announced the winner today.

And the winner is...

Peggy Clyde of Peggy's Pantry!!! 

I know Peggy and what a dear lady she is.  I am thrilled for her good fortune.

And congratulations again, Shelby, on your four-year blog anniversary!

Friday, January 6, 2012

Classic Crock Pot Roast Beef

Now here was a meal that was a tasty surprise. I've mentioned it before, but I generally don't make a delicious beef meal, but with a few kitchen staples, this came together easily, and we both liked it. I still think there are few things better than perfect slices of rare, oven roasted beef, but I seem to be particularly challenged in that area.  For now, this suffices very well. Ole Sweetie-Pi loved this. Personally, I'm more into the mashed potatoes and gravy.

Crock Pot Roast Beef
(found on:  http://crockpotroasts.com/recipes/classic/)

1 2-3 pound boneless beef chuck roast
1 tablespoon vegetable oil **

1 14.5 ounce can beef broth
1 8-ounce can tomato sauce
1 tablespoon Worcestershire sauce **
3 cloves garlice, diced

1 onion, roughly chopped
3 stalks celery, roughly chopped
3 carrots, peeled, roughly chopped
salt and pepper to taste
1 teaspoon red pepper **
3 bay leaves **

Trim the roast of excess fat and then salt and pepper.  Heat the oil to hot in a saucepan large enough to hold the roast.  Salt and pepper the roast and put the roast in the sauce pan to brown the roast on all sides, generally about two minutes per side.

Place all your vegetables on the bottom of the crock pot and then place your roast on top of them. 

In the same pan that you browned the roast, lightly brown the garlic, then add the broth, Worcestershire sauce,  and tomato sauce..  Reduce the liquid to about half and then pour over the roast beef.  Set your crock pot to low for 7 to 8 hours or on high for 4-5 hours,or until the roast is done.

**MY NOTES:  I had bacon grease left over from that morning's breakfast, so I browned my roast in bacon fat.  I don't like a lot of Worcestershire, so I reduced the amount to about 2 teaspoons.  Same goes for red pepper, I omitted it.  The original recipe didn't call for bay leaves, but I sampled the sauce after the beef had been cooking a while and felt it was lacking a little something (probably the additional Worcestershire and red pepper, smiles) and threw in some bay leaves.  Perhaps a wee bit of ketchup for acid would be good?

This made quite a bit of gorgeous meat juice.  I scooped some from the pot and put it in a saucepan and made a slurry of two tablespoons cornstarch to about a quarter cup of water.  I added a splash of it to the roast beef juices and  cooked and stirred until I saw how thick it was going to be, adding small amounts of slurry and stirring until I achieved a desired gravy consistency.  Taste for seasoning.  I'm thinking the rest of the meat juices will make a mighty fine minestrone with some of the leftover roast beef and frozen mixed vegetables and little pastas thrown in.

Sunday, January 1, 2012

Shortbread Cookies - Norwegian Morkaker


I don't know about you, but I greatly enjoy meeting people who have different food traditions than mine. You get to know a lot about people (do you eat from a common pot or tray ~as some African nations, or is everything in separate bowls~as in some Asian nations). Food and eating is a common denominator for all peoples. Forget stuffy boardrooms and press conferences. Let's have world peace kitchens.  Come in, by my side, let's share, exchange food and traditions, and talk.

Sweeti-Pi's sister's beloved Lloyd is Norwegian and I savor every word as he speaks of his childhood and the foods he remembers and loves.  Lloyd nearly waxes poetic as he speaks of his mother's fish recipes (herring and salmon in particular it seems), but fish is something I try once every couple of years, just to confirm, yep, still don't like it. 

So, that leaves me with baked goodies, a task I undertake with delight for Lloyd. I saw this simple recipe on Norway-Hei.com and could not resist its simplicity.   I can assure you with great enthusiasm, I loved these cookies.  Methinks these are a cousin to the snickerdoodle, not so much cinnamon and sugar, but lots of gorgeous butter,  tender, slightly crispy.  This cookie is going to be year 'round favorite with me for its ease of preparation, simple pantry ingredients, and delicious flavor.

Alas, I cannot say how the cookies went over with Lloyd.  I can attest that his and Susan's three naughty cats liked them, as the box I packaged them in was gnawed on and broken into...apparently the aroma was irresistible to them...

The dough requires a couple hours of refrigerator time, so you might want to start these earlier in the day and putter about until you're ready to bake.


1/2 pound (2 sticks) butter, no substitutes (!)
2/3 cup sugar
2 1/2 cups flour

cinnamon-sugar mixture (roughly 1/4 cup sugar with 1 1/2 teaspoons cinnamon)

In a medium-sized bowl, cream the butter and sugar until white and creamy, about 6 minutes.  Add the flour gradually until well blended. 

Chill the dough in the refrigerator, about 30 minutes.  Remove the dough and place on waxed paper and form a 2-inch roll.  Place back in the refrigerator to complete cooling (about two hours).

Sprinkle cinnamon and sugar on all sides of the outside of the cookie roll.  Cut into slices and place on cookie sheets. Bake at 387*F for 10 minutes.  Cool cookies completely before placing in airtight tin.

**MY NOTES:  I took a shortcut with this recipe that seemed to work pretty well.  After mixing all the ingredients, the dough is crumbly, but will form a mass if gently squeezed.  I ripped off a two foot or so piece of waxed paper and squeezed the dough into a rough cylinder, and then rolled the dough in the wax paper, shaping further as I rolled it.  I cut off any excess waxed paper, tucking ends up to form a neat cylinder and then just popped in the refrigerator for two hours.  No need to handle the dough twice.

The cinnamon adhered well to the dough roll, but the sugar wasn't quite so cooperative.  I spread a line of cinnamon sugar mix on the waxed paper and gently, but firmly rolled my cylinder of dough back and forth through it.